Derezzed
This MP3 was found at Dilandau MP3

Saturday, March 19, 2011

Perfect in Purple

I am going to be doing some tutorials with a color theme!
I want to give the titles cute names according to the theme like: Perfect in Purple, Pretty in Pink, Green with Envy, Roses are Red.. Like that.
If you have any ideas about what I should do next, please leave me a comment letting me know! =)
~~~~~~~~~~~~~~~~~~~~~~~~~~~~~~~~~~~~~~~~~~~~~~~~

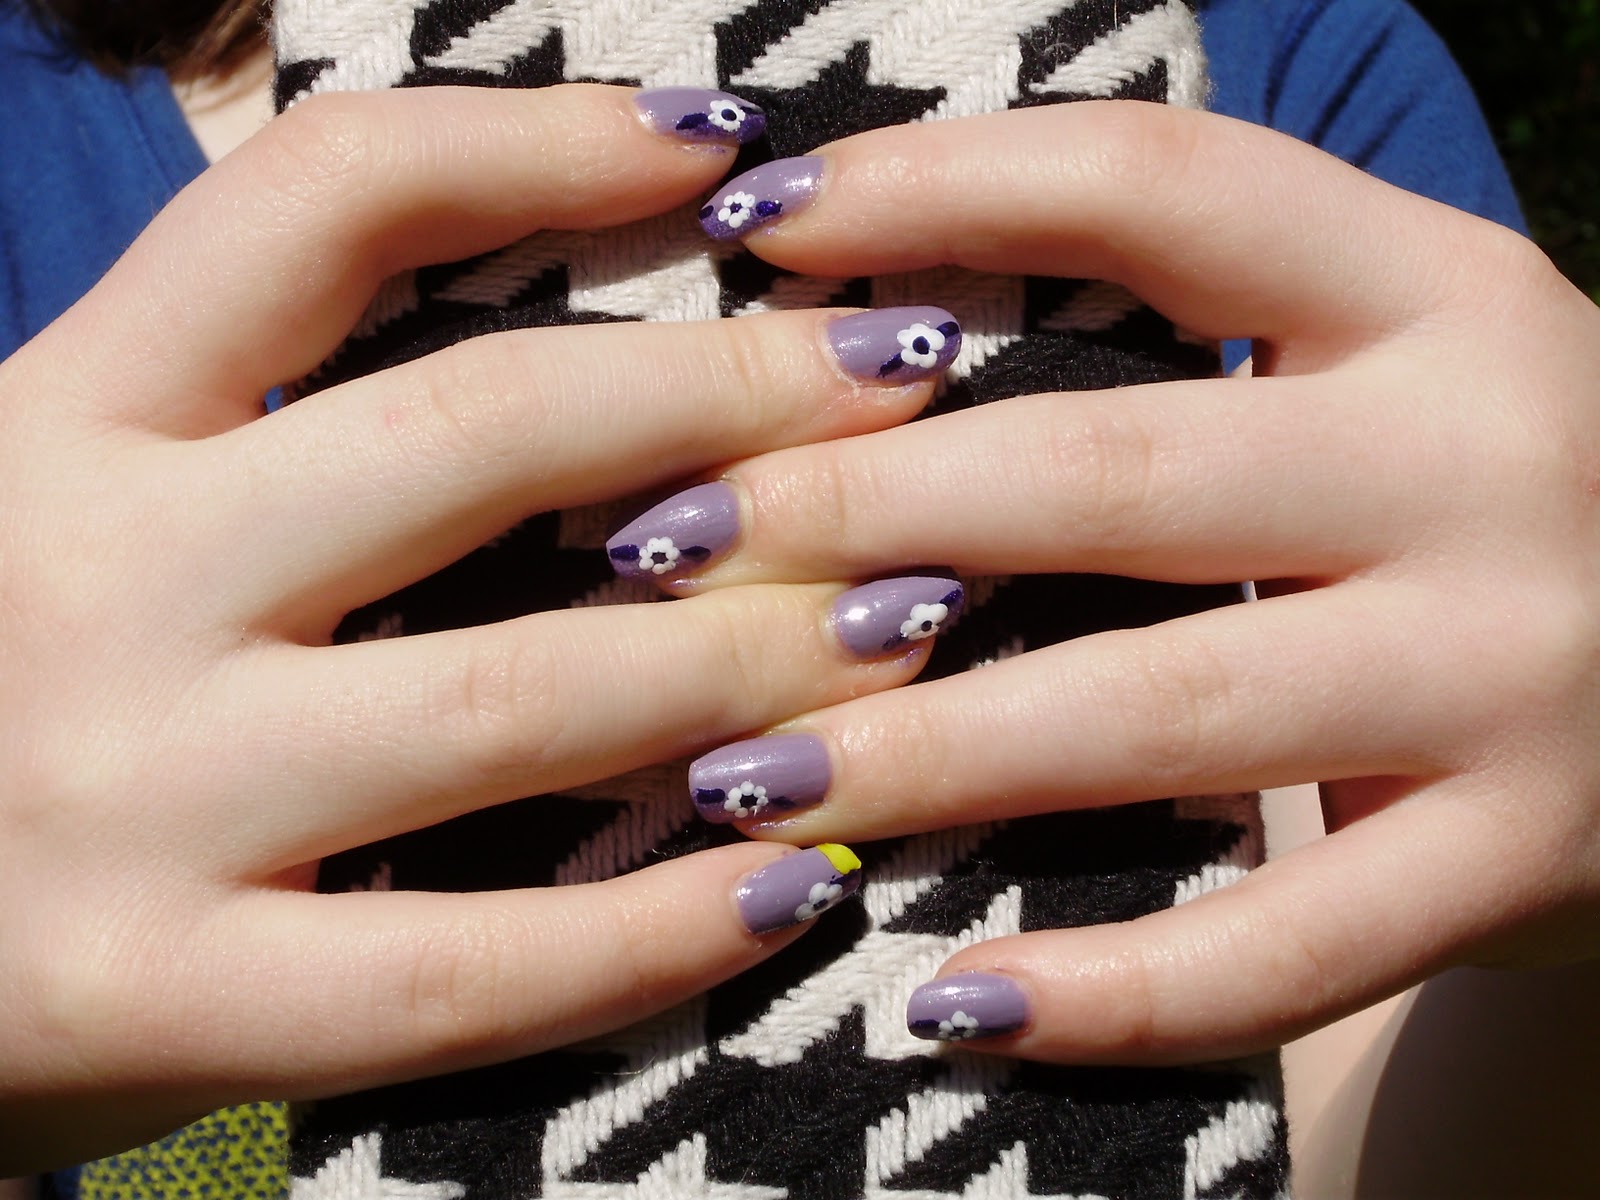
 I have a best friend who's birthday is next week, and her favorite color is purple! So, this tutorial is for her =)

You will need: White, Lavender, Violet, and Dark purple nail polish. Also: a dotting tool (here I am using the end of a paint brush) and a makeup sponge.

Let's get started!


Step 1: Using two coats of the lavender color, paint all the nails.


Step 2: Taking your makeup sponge, and the violet color, dab on the polish at an angle on the tip of the nail.


Step 3: Using the darkest purple, make a design that looks like this: -.- but the dot will be in the middle, not down lower =P


Step 4: Last Step! Using the white, and depending on the size- make 4 to 5 little dots around the purple one in the middle

All done!!


By the way: I love houndstooth! Isn't it cute!?


Thank you so much for reading my blog!

Best of luck
xoxo,
Winter

Sunday, March 13, 2011

St. Patricks Day

It's St. Patricks Day this week! So, I'm going to show you a Irish/St. Pattys Day tutorial!


You will need: Green, white, orange nail polish, and a dotting tool.


Step 1: Paint your index finger nails green. Do the same with your middle and ring fingers using the white in the middle and the orange on the ring finger.


Your nails should look something like this =)


Step 2: Using the dotting tool, paint three dots close together in a triangle to form a 'clover shape'
Remember: it doesn't have to be perfect =)


Maybe it's just me but, I think little clovers like this are so cute!


Step 3: This is optional! Taking your dotting tool, make a small circle on your thumb nail and shape it to look somewhat like a cauldron/bucket whatever you want to call it. Add little yellow dots in whatever pattern you like for the little gold pieces. And your finished!


Done!! Yay!


As always, I appreciate anyone who reads my blog =)
Happy St. Patricks Day!!

xoxo,
Winter

Friday, February 25, 2011

Easy Red and Black

For this nail tutorial, you will need:
Two colors of your choice (I recomend a light and a dark) and adhesive clear tape =)


Step 1: Paint your whole nail with the light color.

*Tip: Put lotion or vaseline around your nail before you paint it; if you get a little polish there, let it dry onto the lotion. When your done painting, just wipe the lotion or vaseline off! The leftover polish will come off with it!*


They should look something like this =)


Step 2: Taking a small strip of your tape, wrap it carefully around your finger; leaving a small space between the tape and the tip of your nail. MAKE SURE your nails are dry before doing this!


They will look something like this =) Almost done!

Step 3: Taking your dark color, paint the tips. After you've done that: carefully remove the tape (see my index finger.)

Lookin' Good!


Your Done!!


I appreciate anyone who takes the time to read the tutorials on my little blog!


If you liked this tutorial or have any ideas on how I should paint them next, please leave me a comment =)

Good Luck!
xoxo, Winter

Thursday, February 17, 2011

First Tutorial: Spring


Since it's almost springtime, I'm going to show you a nail tutorial with a spring theme :)
Keep in mind, you can use any colors you want. So, if you don't care for these colors, try to imagine the design in the colors you would choose.


Let's Start!
You will need: A background color, a grass color, two colors for the flower (one for the petals and one for the middle), a makeup sponge, a dotting tool, and a scrap piece of paper.


*Tips: If you don't have a dotting tool you can use a number of other household objects: A toothpick, a hair pin, a paintbrush- either end-, or a pencil. Which ever you find works the best. Makeup sponges: I highly recomend getting some because, they are very useful and there's not really any other way to get the "sponged" effect without it.*


Step 1: Pour a little pool of your background color on to the piece of paper. Then, taking your makeup sponge: dab it into your little pool and tap it on the paper to test your dabbing (as you can see, I do this alot)


Step 2: Once you've done a little practicing on the paper, do the same thing and apply it to all of your nails.

Note: It's okay if it's darker in some places, it doesn't have to be perfect.


Step 3: Pour a little pool of your first petal color on to the piece of paper. Then taking the dotting tool: dab it into the pool and tap it on to the paper to practice like you did with the sponge.
When you've practiced a little, dab it in again and apply it four times in a little circle to all of your nails.


Your nails should look something like this : )


Step 4: Pour another little pool of your second flower color (for the middle) and taking the dotting tool again, dip it into the pool and tap it on the paper for practice. Then apply it to the center of your little flowers.


Your nails should look something like this : )
Almost done!


Step 5: (Last Step!) Pour a small pool of your grass color on to the paper. Then taking the makeup sponge: dab it in the pool and after a few test taps on the paper, apply this to the TIPS of the nails. 


And your finished!

I appreiciate anyone taking the time to read my blog!
Thank you so much!


Best of luck!
xoxo, Winter